


Part 4 - How to Code the Tree
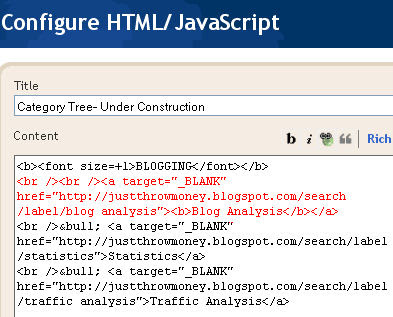
I suggest beginning to build your tree in a text editor such as Notepad. Once you understand what you are doing, then you can cut and paste the code into an HTML widget.
Use your outline to guide the build. In fact, you can paste that outline right into Notepad, and then add the links around the words/phrases you have chosen.
Call Labels or Search Results
There are two basic choices of ways to pull content from your blog, and those go back to The Difference Between Search and Labels in Blogger.
• You can call all posts which have been given a certain label.
• Or you can call all posts which contain a certain word or phrase.
Using the choice to call a label is preferred, but there might be times when you would want to call a search.
Write the Code
Here is how to call all the posts with a certain label, for example "spam."
<a href="http://yourblogurl.blogspot.com/search/label/spam">spam</a>
Just use that format and substitute whatever label you are listing for the word "spam," and your own blog's url for "yourblogurl.blogspot.com" You can make it so that each result will open in a new tab/window by inserting the 'target="_BLANK"' code:
<a target="_BLANK" href="http://yourblogurl.blogspot.com/search/label/spam">spam</a>
To call a search use this code:
< href="http://yourblogurl.blogspot.com/search?q=spam">spam </a>
with the adaptations noted above.
To move the text to the next line (like hitting return) add <BR>
To make a heading bold, surround the text with <B>Make this text Bold</B>
Create Hierarchy
There are three ways to create hierarchy for your tree. You can use an unordered list (with bullets), and ordered list (with numbers), or manually add bullets with the desired number of space you want to indent each level.
• For bullets with the default indent (may be wider than you want), surround your entire list with <UL>Your list</UL>, then begin each item with <LI>
• For numbered items use the same structure, but substitute OL for the UL
• To manually place bullets use • , you can use the space bar to put one space before and after the bullet, if you want more spaces use for each desired space.
Example
If you look at the graphic in this post, it's the code for the first section of the category tree in the right column. I've highlighted the code for the title line "Blog Analysis" in red. You can see that I chose to also make the title a link for a label that includes all the posts from the whole category, and that I've chosen to make it bold.
You can see that the subheadings are bulleted by manually adding my own bullets.
Once you have gotten a good start on coding your tree, you can place in in your blog. More on that in Part 5- Where Should I Put a Category Tree?.
Category Tree Tutorial Index

 Is your blog one that doesn't have a title showing in the tab bar? Most blogs create this automatically when you initially set it up. Maybe you started your blog before you thought up a name. Maybe you just have no idea why the name doesn't show. It's really easy to fix!
 I've known how to do this for quite a while, but finally got around to adding a custom icon to my blogs. You will now notice a little shark in the tab of all my blogs, and also at the end of the search bar.
 It's good to have a custom icon in several sizes. Any program that looks for them will automatically choose the correct size. If you have an icon, it is easy to add the code to Blogspot blogs. Your icon can be a .gif or .ico file. Here's how. (Remember that it's always a good idea to save a copy of the template that is working properly before you go making changes!)


